Integrate WalletConnect v2.0 with React Native + Expo

Why walletConnect V2?
The overall UX between WalletConnect v1.0 and v2.0 are the almost same. You will find an almost identical developer experience as well, except for two key differences.
projectIdwill be required on v2.0 for the cloud version of WalletConnect, but this will not be required for self-hosted WalletConnect relays.The bridge URL is no longer supported. It has been replaced by the relay URL, which is
wss://relay.walletconnect.com.
To learn more about the protocol changes between WalletConnect v1.0 and v2.0, click here.
Prerequisites
Before diving into this tutorial, it's important to ensure that you have the necessary software installed on your machine. Specifically, you'll need Node.js v16 or greater and Expo CLI.
To avoid any issues or errors, make sure to download and install these programs before proceeding with the tutorial.
Setting up React Native app with Expo
To start, set up a React Native app and install dependencies by running the command in your terminal:
We'll use TypeScript for our project, making development more efficient and reliable.
npx create-expo-app -t expo-template-blank-typescript
This command creates a new React Native app using Expo CLI. After it's created, run another command to install additional dependencies. The process may take time depending on your computer and internet speed.
npx expo install @web3modal/react-native
We rely on this dependency to enhance the functionality of our application by allowing users to open a modal on their mobile devices. This feature provides users with greater convenience and a more seamless experience. Additionally, this dependency facilitates connectivity with a variety of wallets, making it easier for users to sign messages.
npx expo install @react-native-async-storage/async-storage react-native-get-random-values react-native-modal react-native-svg
@react-native-async-storage/async-storageprovides an asynchronous, unencrypted, persistent, key-value storage system for React Native.react-native-get-random-valuesis useful to polyfill for libraries like uuid that depend on it.react-native-modalis expanding the original React Native<Modal>component by adding animations, style customization options, and new features, while still providing a simple API.react-native-svgprovides SVG support to React Native on iOS, Android, macOS, Windows, and a compatibility layer for the web.
Additional Setup for Expo SDK 48+
If you are using Expo SDK 48+, there's an issue with react-native-get-random-values, so we need to temporarily fix this by installing their crypto library.
npx expo install expo-crypto
Now, you need to add one file in your root folder called expo-crypto-shim.ts which will create and solve the problems to get random values.
// Polyfill for expo-crypto until issue with react-native-get-random-values is solved
// Apply only with Expo SDK >= 48

import { getRandomValues as expoCryptoGetRandomValues } from "expo-crypto";

class Crypto {
  getRandomValues = expoCryptoGetRandomValues;
}

// eslint-disable-next-line no-undef
const webCrypto = typeof crypto !== "undefined" ? crypto : new Crypto();

(() => {
  if (typeof crypto === "undefined") {
    Object.defineProperty(window, "crypto", {
      configurable: true,
      enumerable: true,
      get: () => webCrypto,
    });
  }
})();
Apply Polyfill in our project by adding this line in app.tsx
import './expo-crypto-shim.ts';
Setting up walletConnect
To use WalletConnect, you need to create a project ID. First, go to https://cloud.walletconnect.com/ and create an account. Then, create a project ID.
To enable the required functionality, you need to take the following steps:
Go to the Explore tab on the website.
Find the option Supports Sign v2 and turn it on.
Add chains you want to use in your dapp ( we will use Polygon Mainnet ).
Save the changes.
Now, open the app and navigate to app.tsx. Add the configuration for web3modal as shown below:
import "./expo-crypto-shim.ts";
import { Web3Modal } from "@web3modal/react-native";
import { StatusBar } from "expo-status-bar";
import { SafeAreaView, StyleSheet } from "react-native";

const projectId = "YOUR_PROJECT_ID";

const providerMetadata = {
  name: "YOUR_PROJECT_NAME",
  description: "YOUR_PROJECT_DESCRIPTION",
  url: "https://your-project-website.com/",
  icons: ["https://your-project-logo.com/"],
  redirect: {
    native: "YOUR_APP_SCHEME://",
    universal: "YOUR_APP_UNIVERSAL_LINK.com",
  },
};

export default function App() {
  return (
    <SafeAreaView style={styles.screenContainer}>
      <StatusBar style="auto" />
      <Web3Modal
        projectId={projectId}
        providerMetadata={providerMetadata}
      />
    </SafeAreaView>
  );
}

const styles = StyleSheet.create({
  screenContainer: {
    flex: 1,
  },
});
There are other options you can add to web3Modal as per your requirement. You can find all options here.
Setting up components
We will connect the wallet using Two methods :
Using Web3Button which is provided by walletConnect
Using our custom Button
Create a components folder then create two folders in that :
ConnectWallet
UI
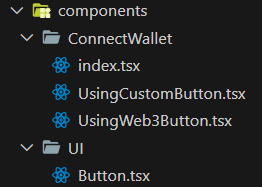
Custom Button
Our Custom Button will Take four props that are used internally and handle all default styles and actions.
Here is Code for our Custom Button :
import React from "react";
import {
  StyleProp,
  StyleSheet,
  Text,
  TextStyle,
  TouchableOpacity,
  ViewStyle,
} from "react-native";

interface ButtonProps {
  children: string;
  style?: StyleProp<ViewStyle>;
  textStyle?: StyleProp<TextStyle>;
  onPress: () => void;
}
const Button: React.FC<ButtonProps> = ({
  children,
  style,
  textStyle,
  onPress,
}) => {
  return (
    <TouchableOpacity
      activeOpacity={0.9}
      style={[styles.container, style]}
      onPress={onPress}
    >
      <Text style={[styles.content, textStyle]}>{children}</Text>
    </TouchableOpacity>
  );
};

export default React.memo(Button);

const styles = StyleSheet.create({
  container: {
    paddingVertical: 16,
    paddingHorizontal: 48,
    borderRadius: 16,
    backgroundColor: "#394867",
    alignItems: "center",
  },
  content: {
    fontSize: 16,
    fontWeight: "600",
    color: "white",
  },
});
You can customize the button as per your requirement or modify it.
Toggle Components
There are three files in the connect wallet folder which is shown in the folder structure above.
The primary file is index.tsx which manages both components and toggles between them.
Add the following code to the index.tsx :
import React, { useState } from "react";
import { StyleSheet, Switch, Text, View } from "react-native";
import UsingWeb3Button from "./UsingWeb3Button";
import UsingCustomButton from "./UsingCustomButton";

export default function ConnectWallet() {
  const [isEnabled, setIsEnabled] = useState<boolean>(false);
  const toggleSwitch = () => setIsEnabled((previousState) => !previousState);

  return (
    <View style={styles.container}>
      <View style={styles.innerContainer}>
        {isEnabled ? <UsingWeb3Button /> : <UsingCustomButton />}
        <View style={styles.toggleContainer}>
          <Text style={styles.title}>Connect using Web3Button?</Text>
          <Switch onValueChange={toggleSwitch} value={isEnabled} />
        </View>
      </View>
    </View>
  );
}

const styles = StyleSheet.create({
  container: {
    flex: 1,
    backgroundColor: "#fff",
    alignItems: "center",
    justifyContent: "center",
  },
  innerContainer: {
    justifyContent: "space-between",
    alignItems: "center",
  },
  toggleContainer: {
    flexDirection: "row",
    alignItems: "center",
  },
  title: {
    marginRight: 16,
    fontSize: 16,
    fontWeight: "600",
  },
});
Import and add the ConnectWallet component to App.tsx to see the result on our device. So, your final App.tsx will look like this :
import "./expo-crypto-shim.ts";
import { Web3Modal } from "@web3modal/react-native";
import { StatusBar } from "expo-status-bar";
import ConnectWallet from "./components/ConnectWallet/index";
import { SafeAreaView, StyleSheet } from "react-native";

const projectId = "YOUR_PROJECT_ID";

const providerMetadata = {
  name: "YOUR_PROJECT_NAME",
  description: "YOUR_PROJECT_DESCRIPTION",
  url: "https://your-project-website.com/",
  icons: ["https://your-project-logo.com/"],
  redirect: {
    native: "YOUR_APP_SCHEME://",
    universal: "YOUR_APP_UNIVERSAL_LINK.com",
  },
};

export default function App() {
  return (
    <SafeAreaView style={styles.screenContainer}>
      <StatusBar style="auto" />
      <Web3Modal
        projectId={projectId}
        providerMetadata={providerMetadata}
      />
      <ConnectWallet />
    </SafeAreaView>
  );
}

const styles = StyleSheet.create({
  screenContainer: {
    flex: 1,
  },
});
Connect Wallet using Web3Button
Now, let's jump to the file UsingWeb3Button.tsx and connect the wallet using <Web3Button/> .
Import useWeb3Modal Hook from @web3modal/react-native . useWeb3Modal gives many states like isConnected, address, open, close, isOpen, and provider.
isConnectedis used to check whether the wallet is already connected or not.addressis simply returns a wallet address of a connected wallet.openis used to open the modal.closeis used to close the modal.isOpenchecks whether the modal is open or not and returns the boolean.providerhas many methods to perform certain types of tasks like signing messages, disconnecting wallet, etc.
import { Web3Button, useWeb3Modal } from "@web3modal/react-native";
import React from "react";
import { StyleSheet, Text, View } from "react-native";
import Button from "../UI/Button";

export default function UsingWeb3Button() {
  const { isConnected, address, provider } = useWeb3Modal();

  return (
    <View style={styles.container}>
      <Web3Button />
      <View style={styles.textContainer}>
        {isConnected ? <Text>{address}</Text> : null}
      </View>
    </View>
  );
}

const styles = StyleSheet.create({
  container: {
    flex: 1,
    justifyContent: "center",
    alignItems: "center",
    padding: 16,
  },
  textContainer: {
    marginTop: 16,
    marginBottom: 48,
  },
});
Here is the final result :
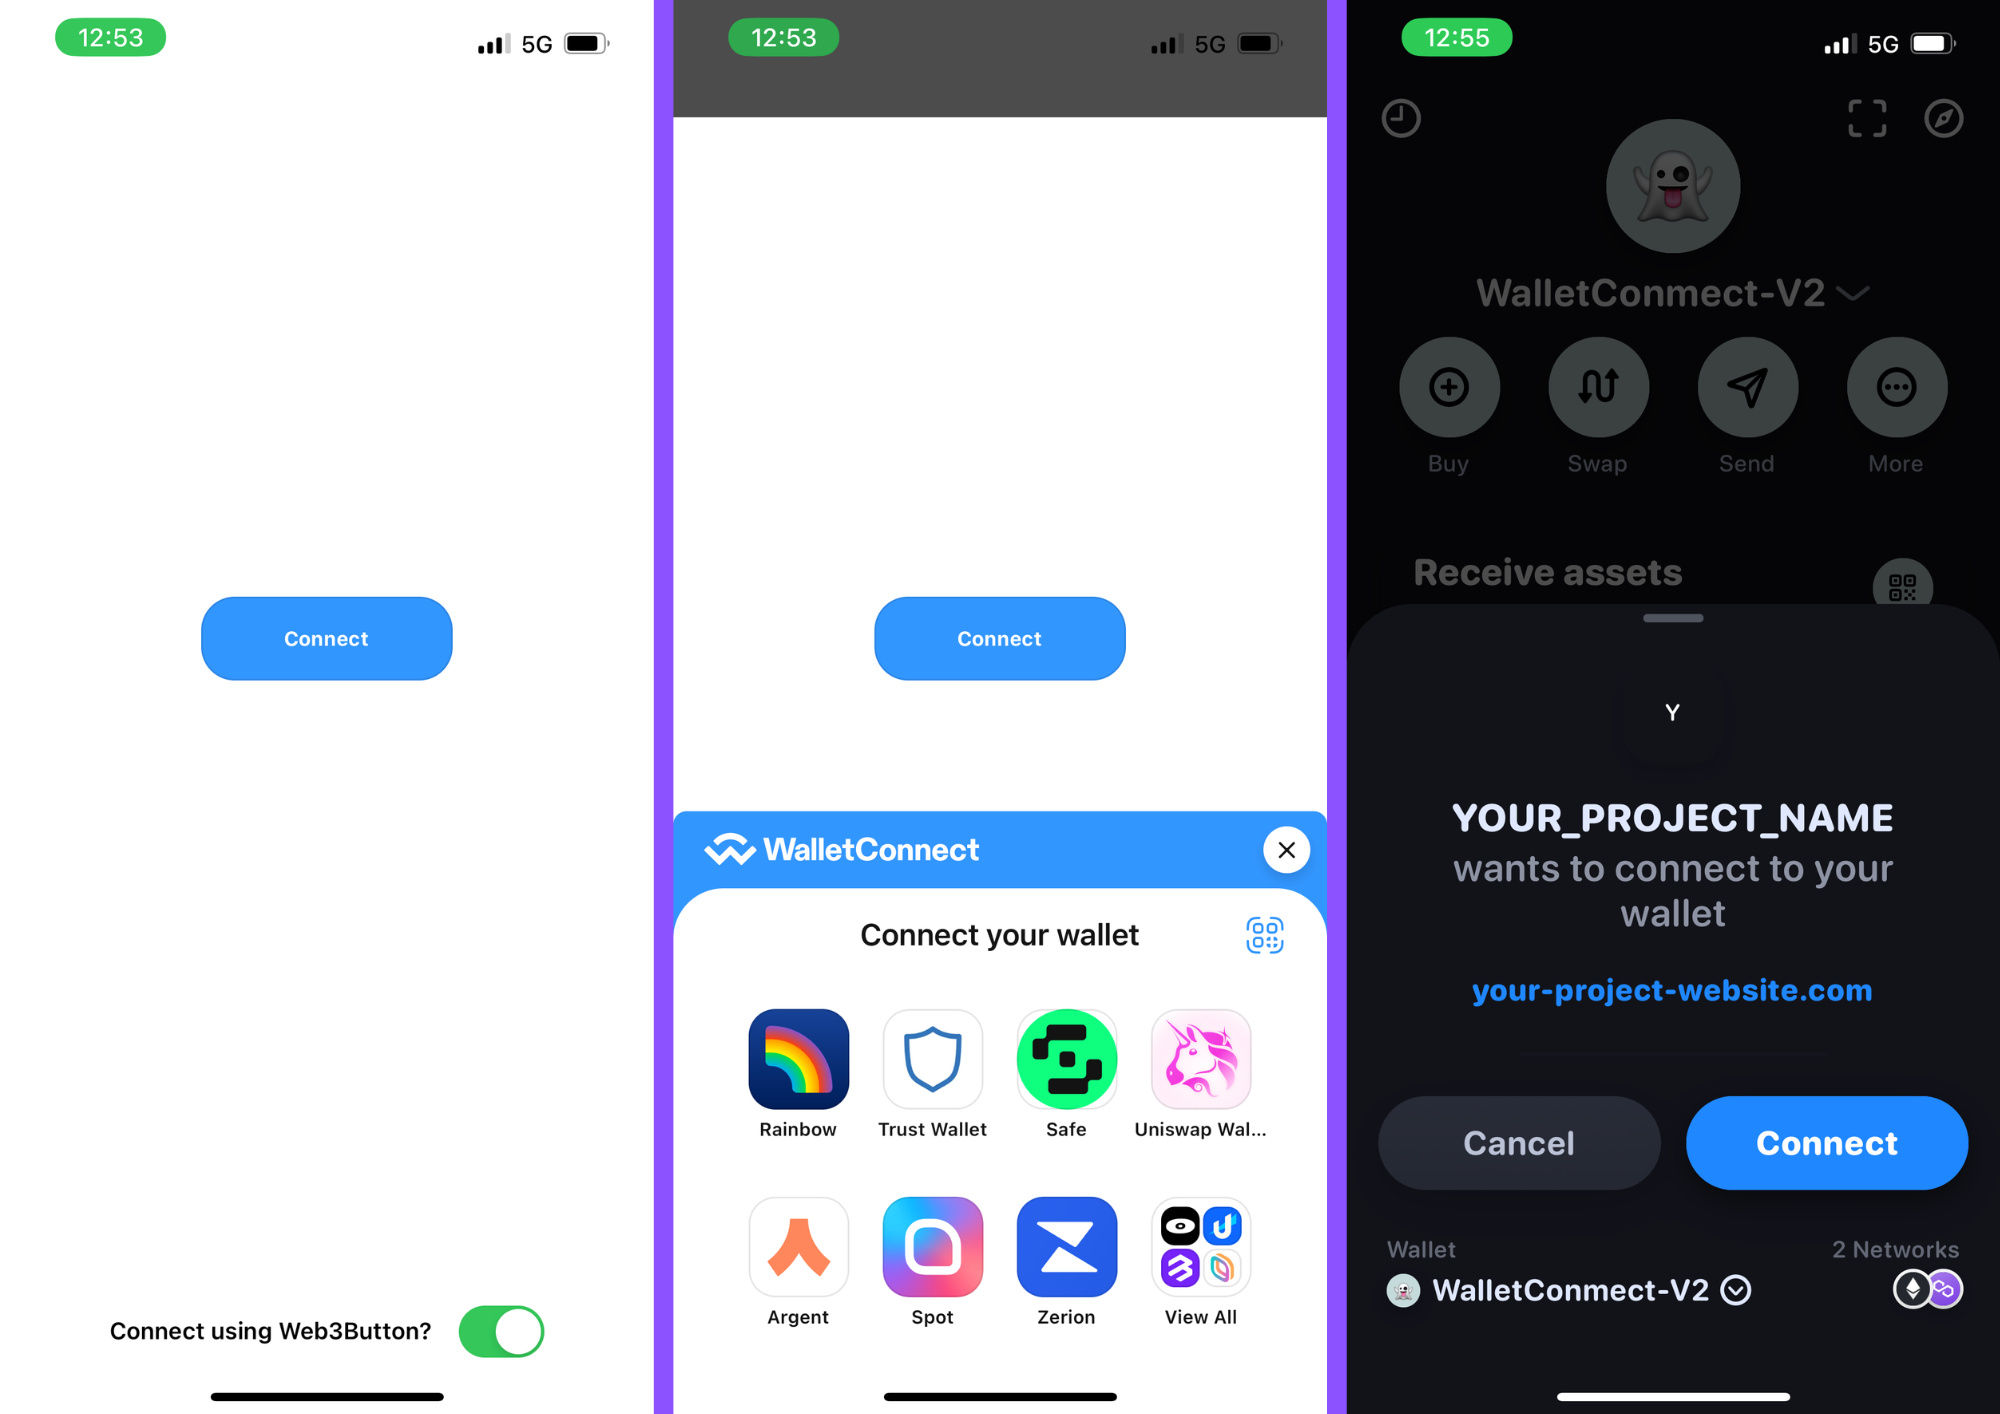
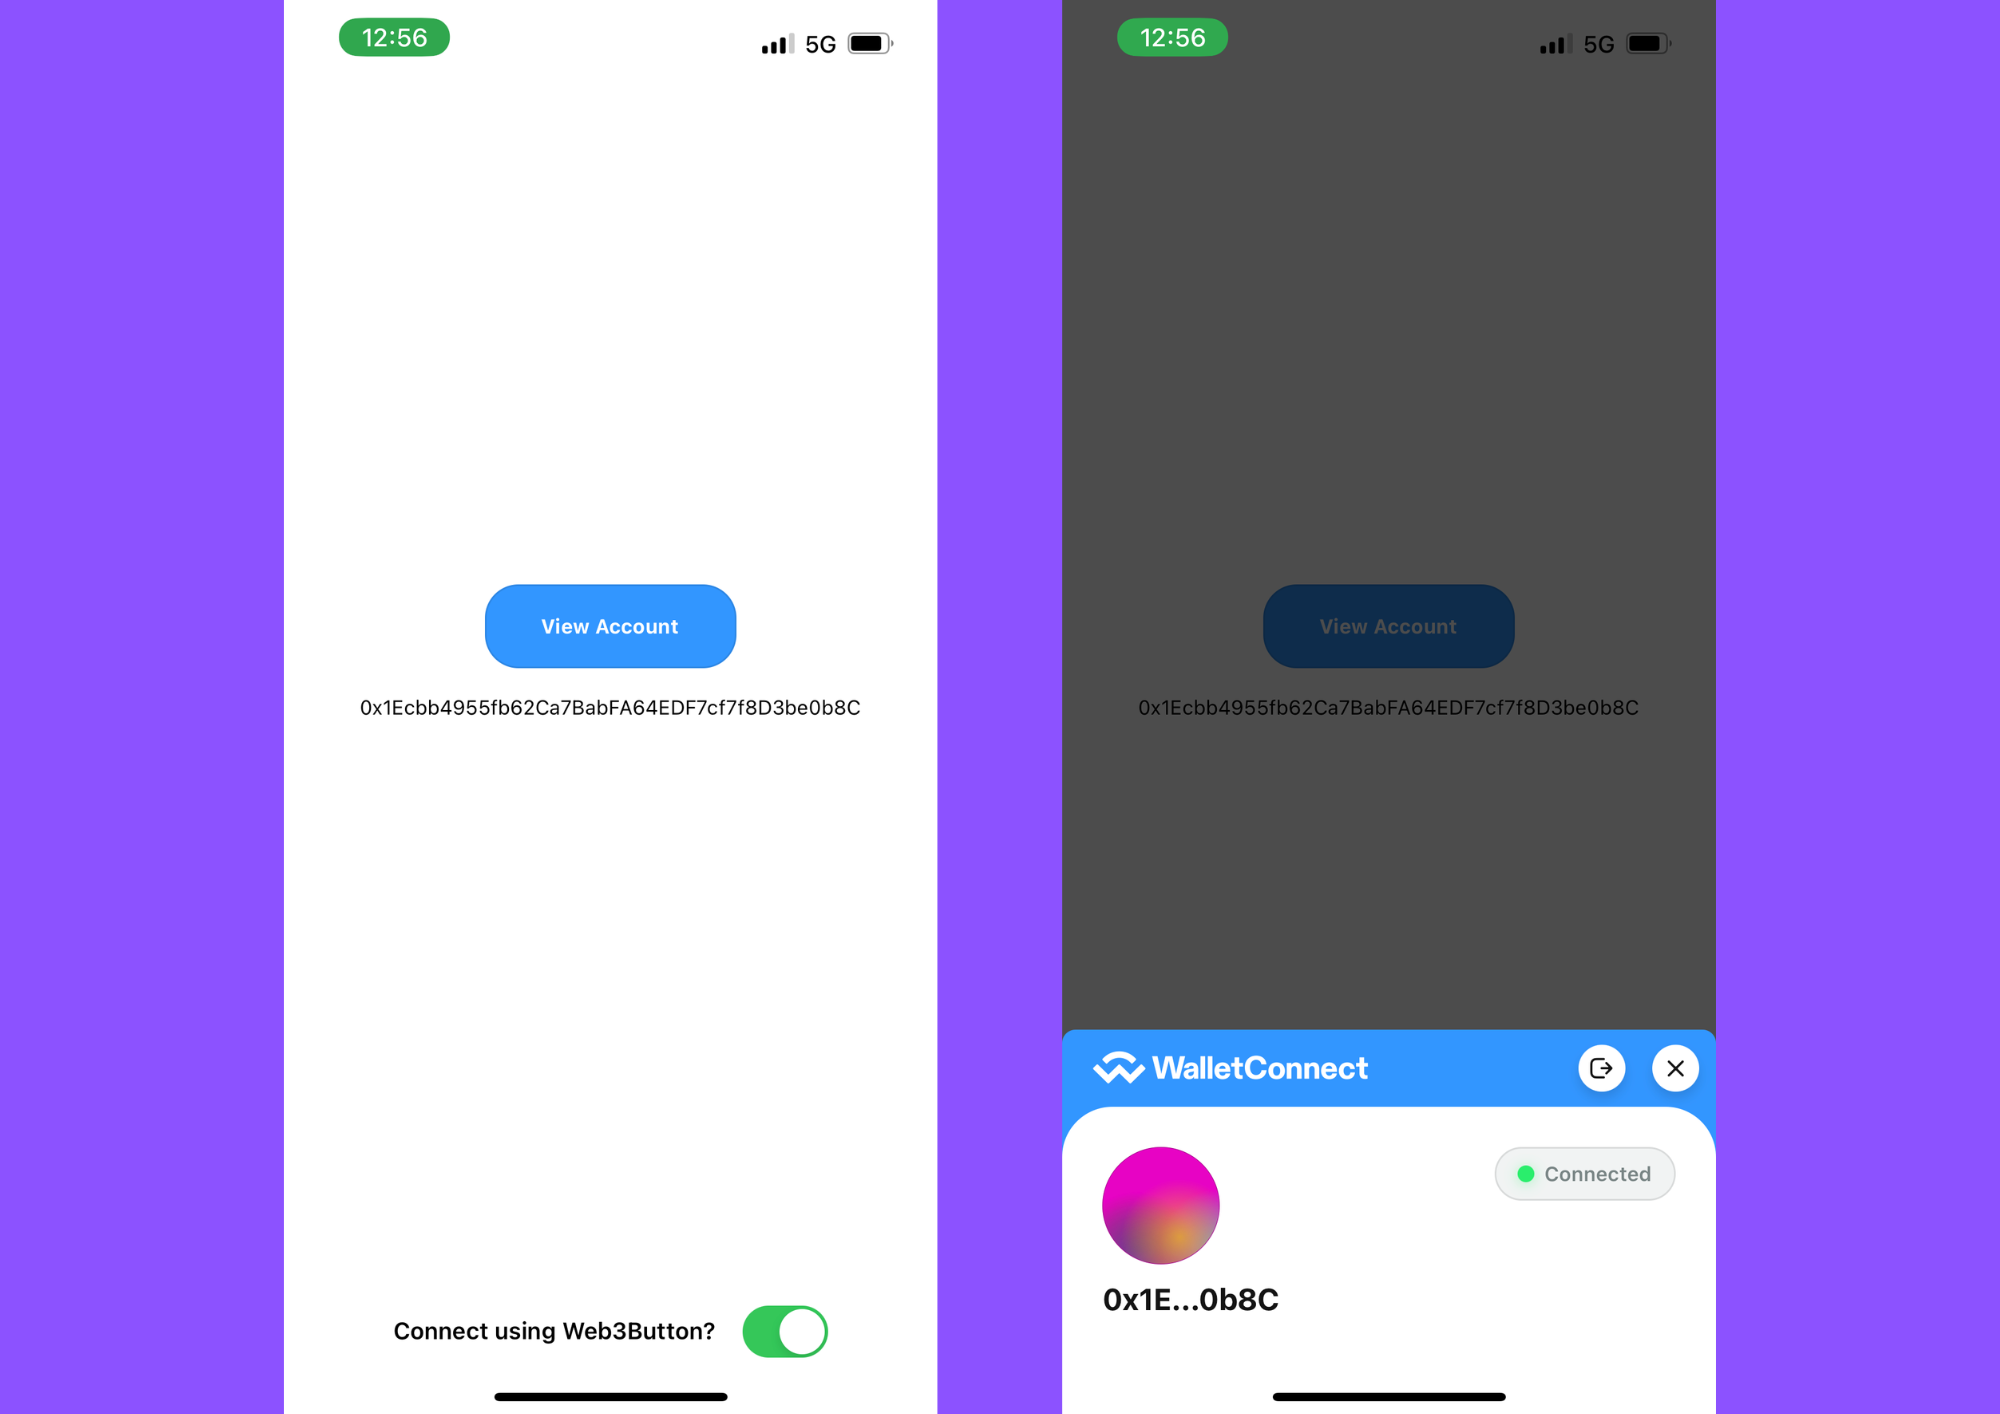
Once the wallet is connected we got the address and you can see it on the screen. Also, connect button will turn into a view account, and if you click on that you can see the modal and disconnect option.
Connect Wallet using Custom Button
All things are the same but in the custom button just we have to open the modal manually when the button is clicked.
For that, we will use the open function which is provided by useWeb3Modal . It will trigger and open a modal for us.
For disconnect, we will use the provider. which provides the provider.disconnect() method to disconnect the wallet.
import { useWeb3Modal } from "@web3modal/react-native";
import React from "react";
import { StyleSheet, Text, View } from "react-native";
import Button from "../UI/Button";

export default function UsingCustomButton() {
  const { isConnected, address, provider, open } = useWeb3Modal();

  const disconnect = () => provider?.disconnect();

  return (
    <View style={styles.container}>
      {isConnected ? (
        <>
          <Text>{address}</Text>
          <Button onPress={disconnect} style={styles.btnStyle}>
            Disconnect
          </Button>
        </>
      ) : (
        <Button onPress={open}>Connect Wallet</Button>
      )}
    </View>
  );
}
const styles = StyleSheet.create({
  container: {
    flex: 1,
    justifyContent: "center",
    alignItems: "center",
    padding: 16,
  },
  btnStyle: {
    marginVertical: 16,
  },
});
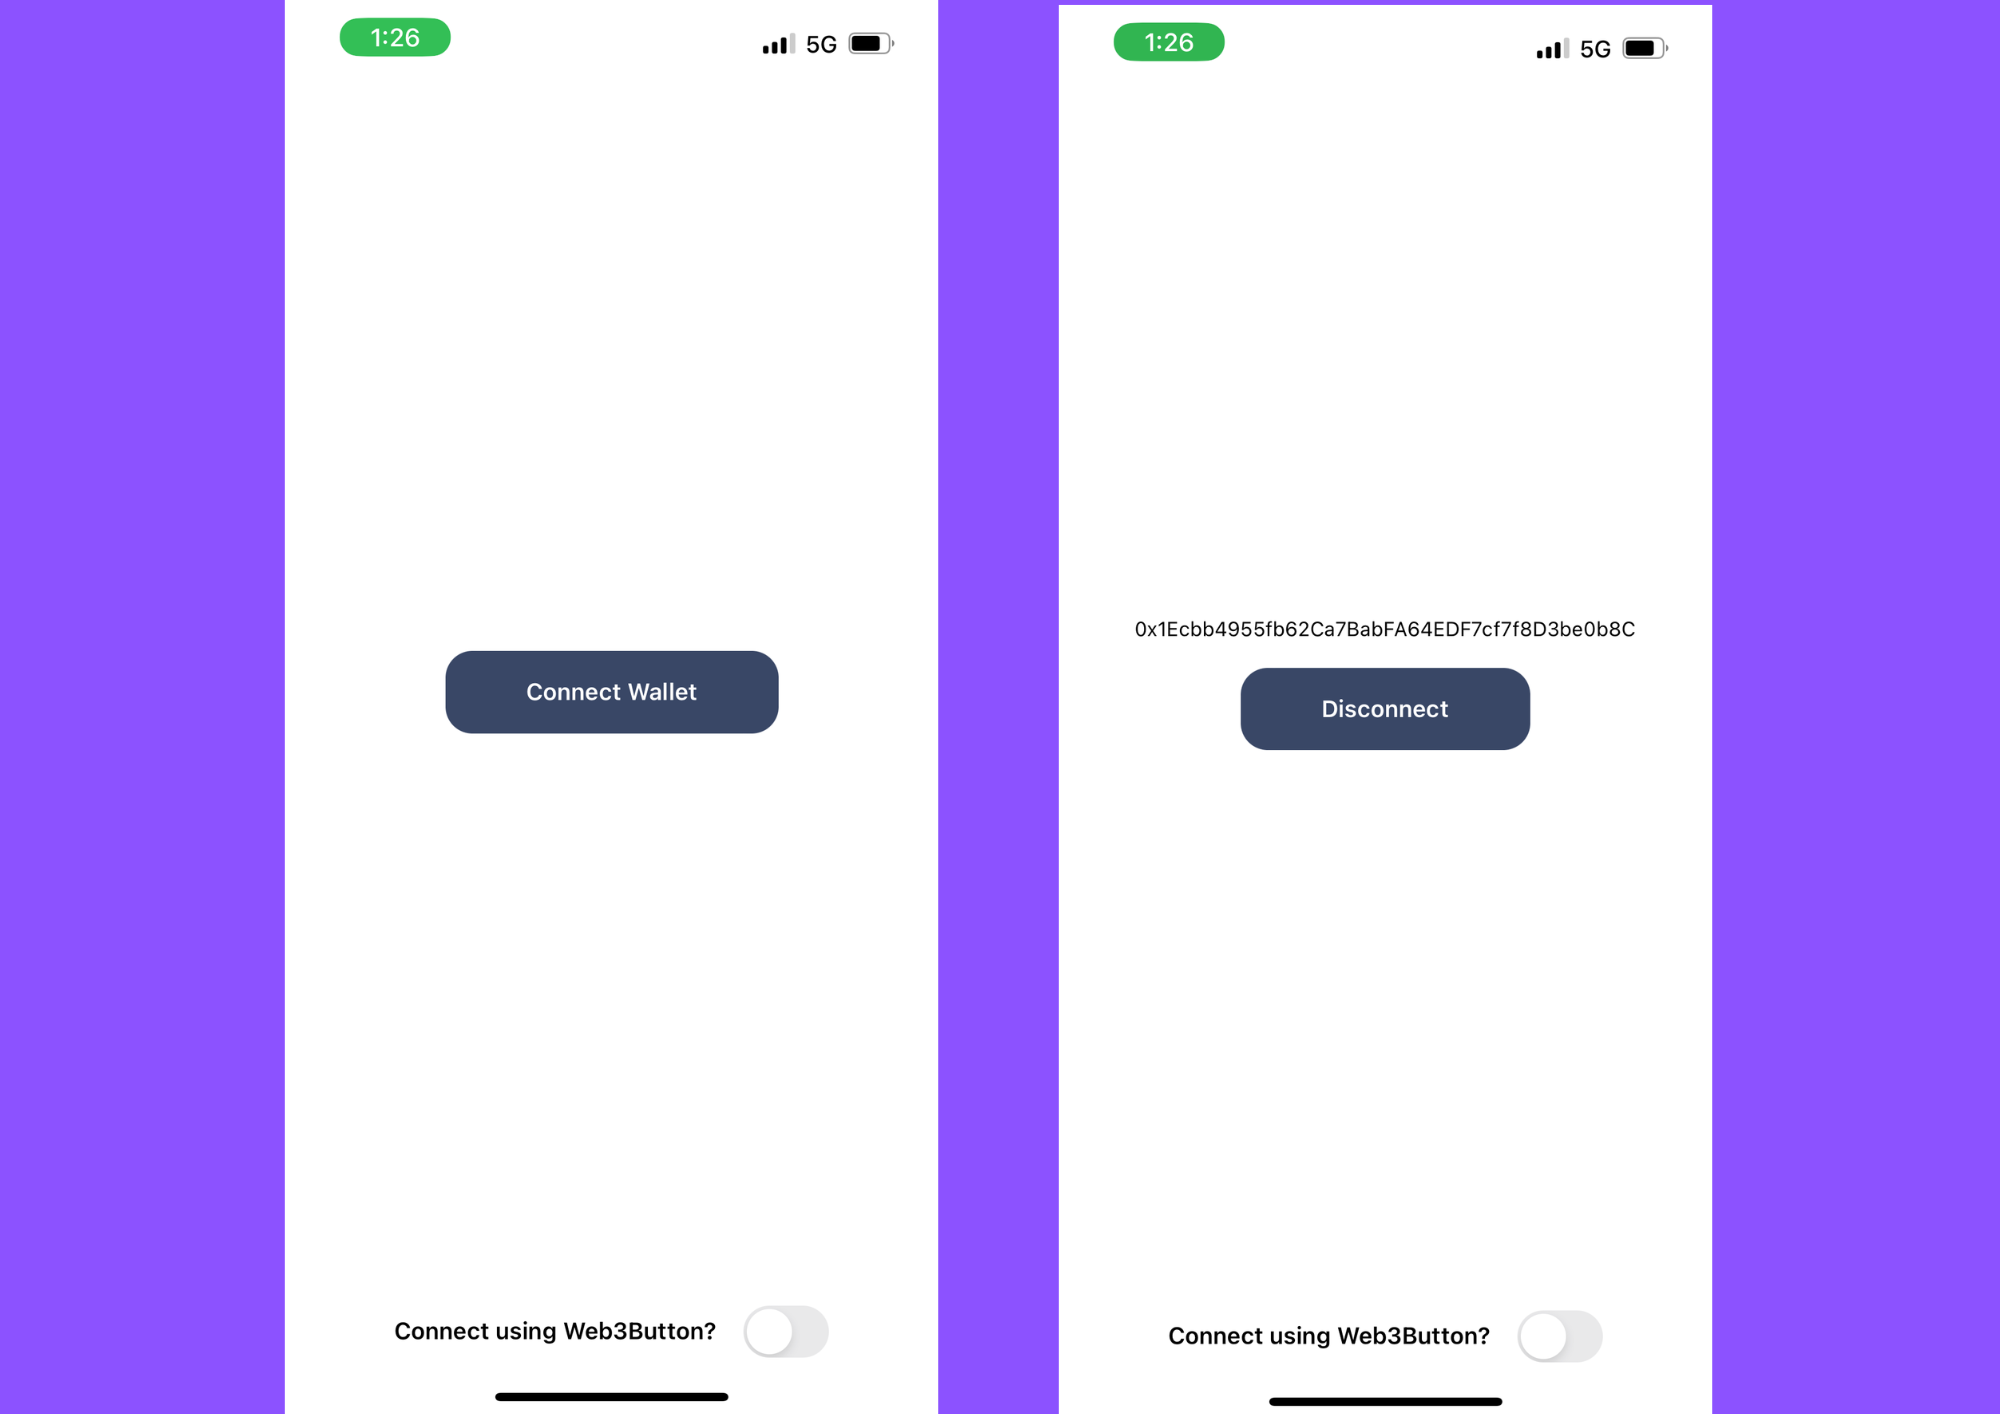
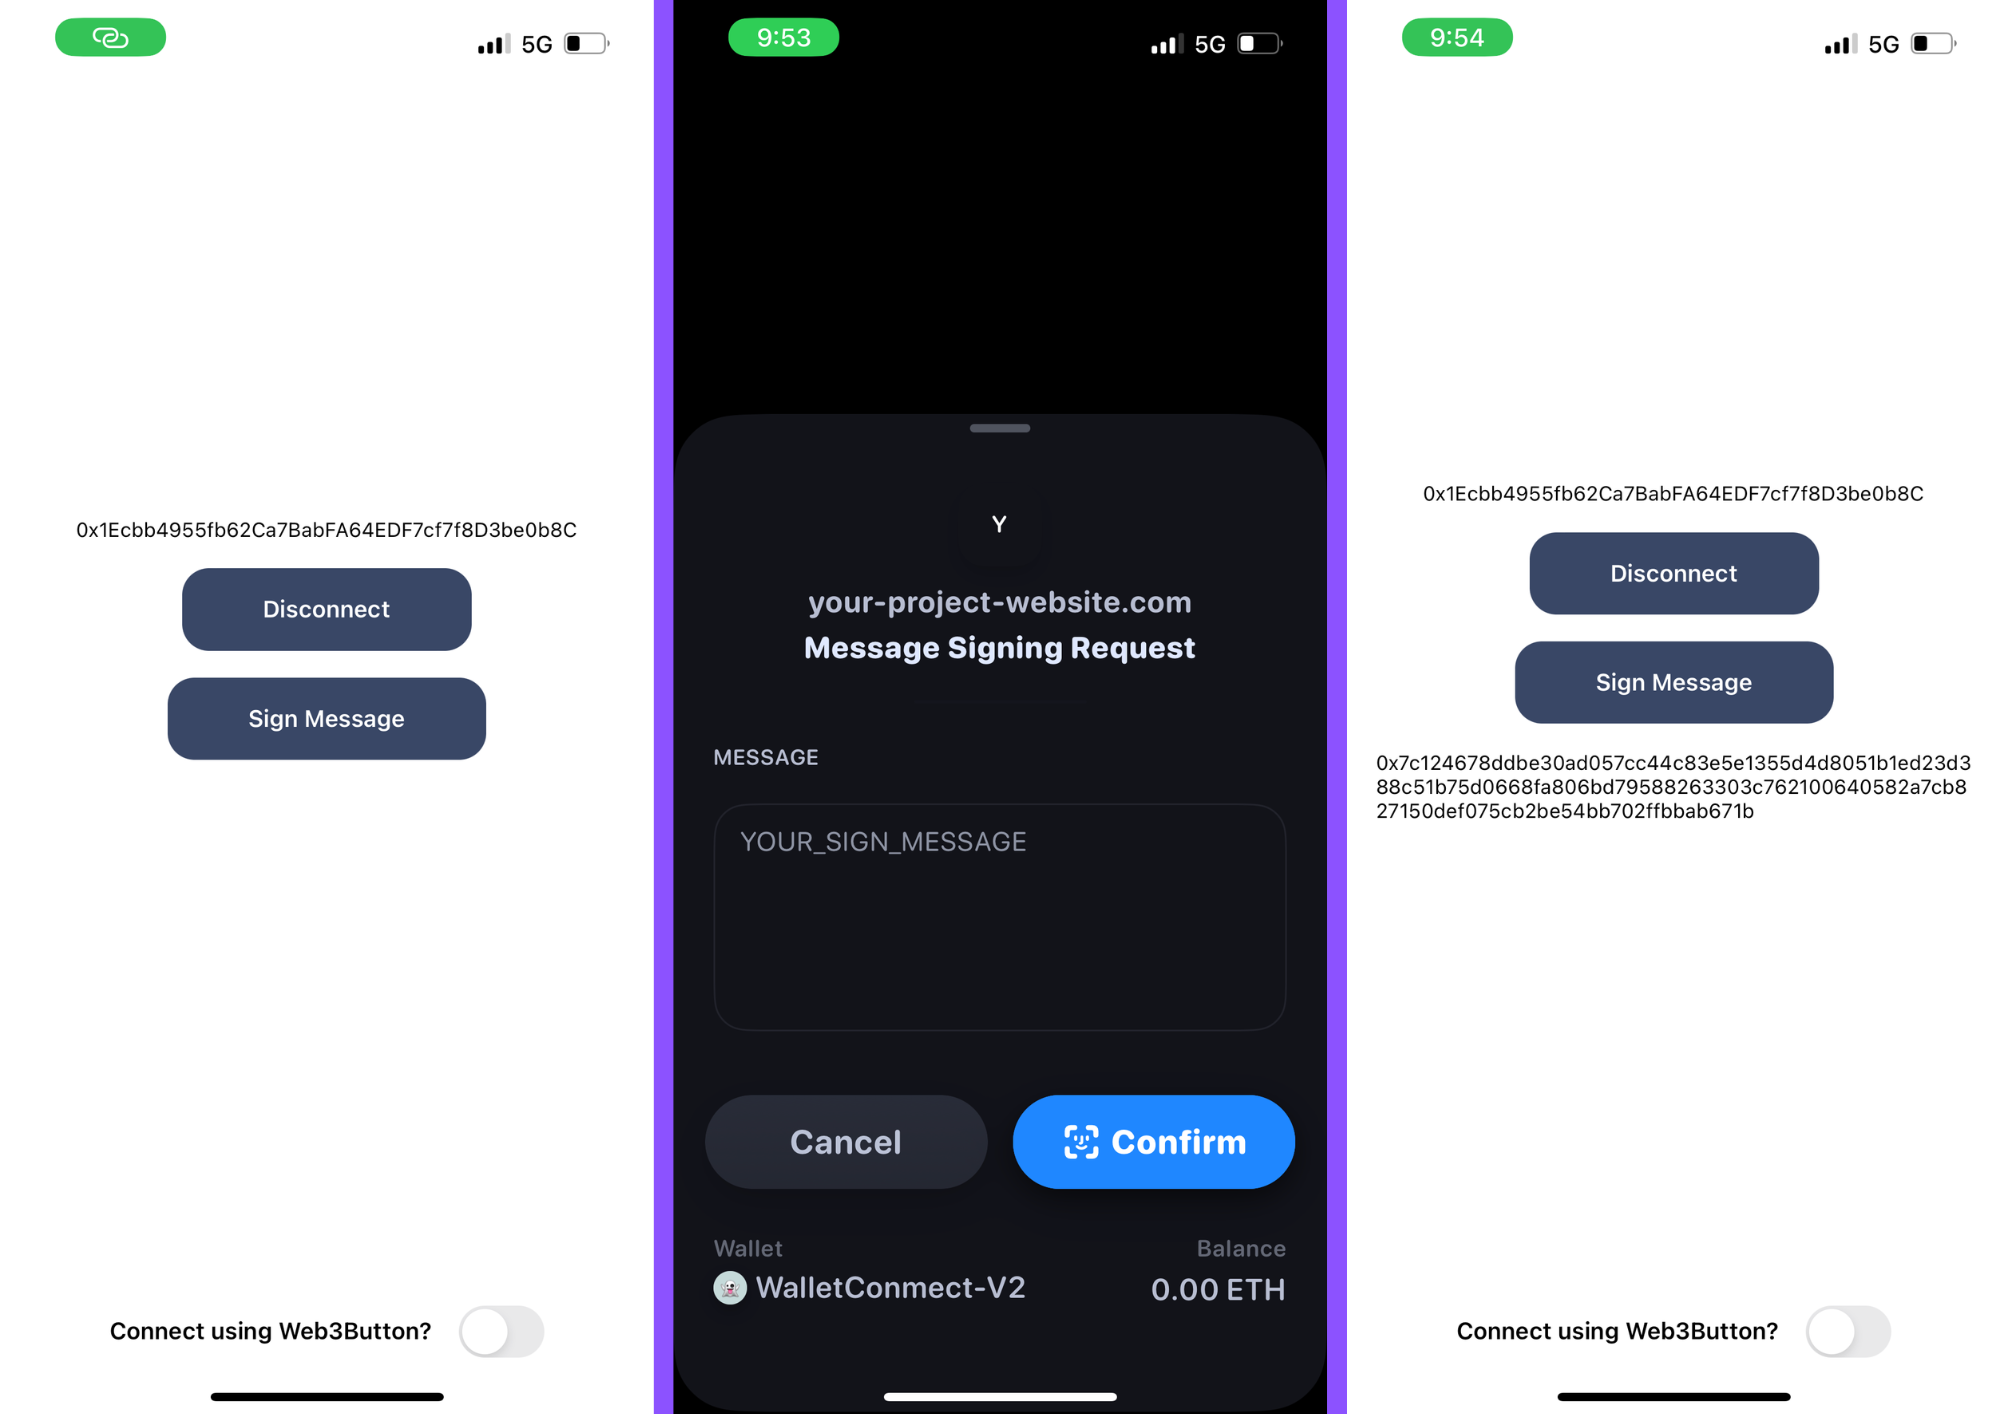
In the same way, once you click on the button modal opens and you have to connect from the wallet. But in the custom button, we have to handle disconnect by ourselves. Once you accept the connection request address and disconnect button appear on the screen.
Request a Sign Message
To Request a sign message we will write a code in UsingCustomButton.tsx and will use a provider for that.
Provider provides a provider.request() method to request a sign message with the connected wallet.
It will take one object and in that object, we have to pass the sign method and params. Pramas takes an array and In that array, we have to pass the address and sign message.
import { useWeb3Modal } from "@web3modal/react-native";
import React from "react";
import { StyleSheet, Text, View } from "react-native";
import Button from "../UI/Button";

export default function UsingCustomButton() {
  const [signature, setSignature] = React.useState<null | string>(null);
  const { isConnected, address, provider, open } = useWeb3Modal();

  const disconnect = () => provider?.disconnect();

  const signMessage = async () => {
    try {
      const signature = await provider?.request({
        method: "personal_sign",
        params: [address, "YOUR_SIGN_MESSAGE"],
      });
      setSignature(signature as string);
    } catch (error) {
      console.log(error);
    }
  };

  return (
    <View style={styles.container}>
      {/* ConnectWallet using Web3Button */}

      {isConnected ? (
        <>
          <Text>{address}</Text>
          <Button onPress={disconnect} style={styles.btnStyle}>
            Disconnect
          </Button>
        </>
      ) : (
        <Button onPress={open}>Connect Wallet</Button>
      )}

      {/* sign message  */}

      {isConnected ? (
        <>
          <Button onPress={signMessage}>Sign Message</Button>
          <View style={styles.textContainer}>
            {signature ? <Text>{signature}</Text> : null}
          </View>
        </>
      ) : null}
    </View>
  );
}

const styles = StyleSheet.create({
  container: {
    flex: 1,
    justifyContent: "center",
    alignItems: "center",
    padding: 16,
  },
  btnStyle: {
    marginVertical: 16,
  },
  textContainer: {
    marginTop: 16,
    marginBottom: 48,
  },
});
Here is the final result :
Conclusion
That is it for this article and here is my GitHub repo link for your reference. I hope you found this article useful, if you need any help please let me know, and let's connect on Twitter and LinkedIn.
Thanks for reading and see you next time 👋